Deploy Data Center Management System
This local system will help users manage their data centers and manage nodes and NTT.
[!Tip|style:flat]
The system only interacts with installed full nodes of Non-Cryptocurrency Public Chains on Spartan Network, and never connects to any external third-party systems.
- For detailed installation instructions, please refer to GitHub.
- To upgrade the Data Center Management System (Optional), please refer to GitHub.
Price Settings
After the initialization of the Data Center Portal System, the price information of each chain will not be displayed, and end-users cannot select chains to purchase Gas Credit. Data Center Operators need to set the chain's Gas Credit price in this module to allow end-users to top up Gas Credit in the portal. After setting the price information, Data Center Operators need to configure the payment method in "Portal Management" -> "Payment Method":
Operation Steps
Click "Gas Credit Management"-> "Price Settings" to enter the page:

Chain Name: Select a chain already registered in the data center;
Gas Credit Ratio: Input the amount of Gas Credit that is worth 1 USD. The default Gas Credit ratio of the chain is shown below, we recommend that you set this value equal to or less than the default one;
Effective Date: The date when the Gas Credit ratio you have set takes effect, which must be equal to or later than the current date;
Submit the request and pending for administrator’s review. Once approved, the Gas Credit ratio of the chain will take effect.
[!note|style:flat]
If the status of the chain in the Price Information List is "Pending Review", you cannot select this chain when adding price information; you can only add new price information of this chain after the review by the administrator.
To change the Gas Credit ratio of a chain, you can directly add a new price, and the system will execute according to the latest effective date of the chain in the Price Information List.
Chain Access Management
After the initialization of the Data Center Portal System, the access information of the chains will not be displayed. You need to configure the access information in this module, including the gateway URL, chain ID (a unique ID mapped to each chain in Kong gateway), access method and restrictions on TPS (transactions per second) and TPD (transaction per day).
Operation Steps
Click "Chain Access Management"-> "Access Configuration" to enter the page:
[!note|style:flat]
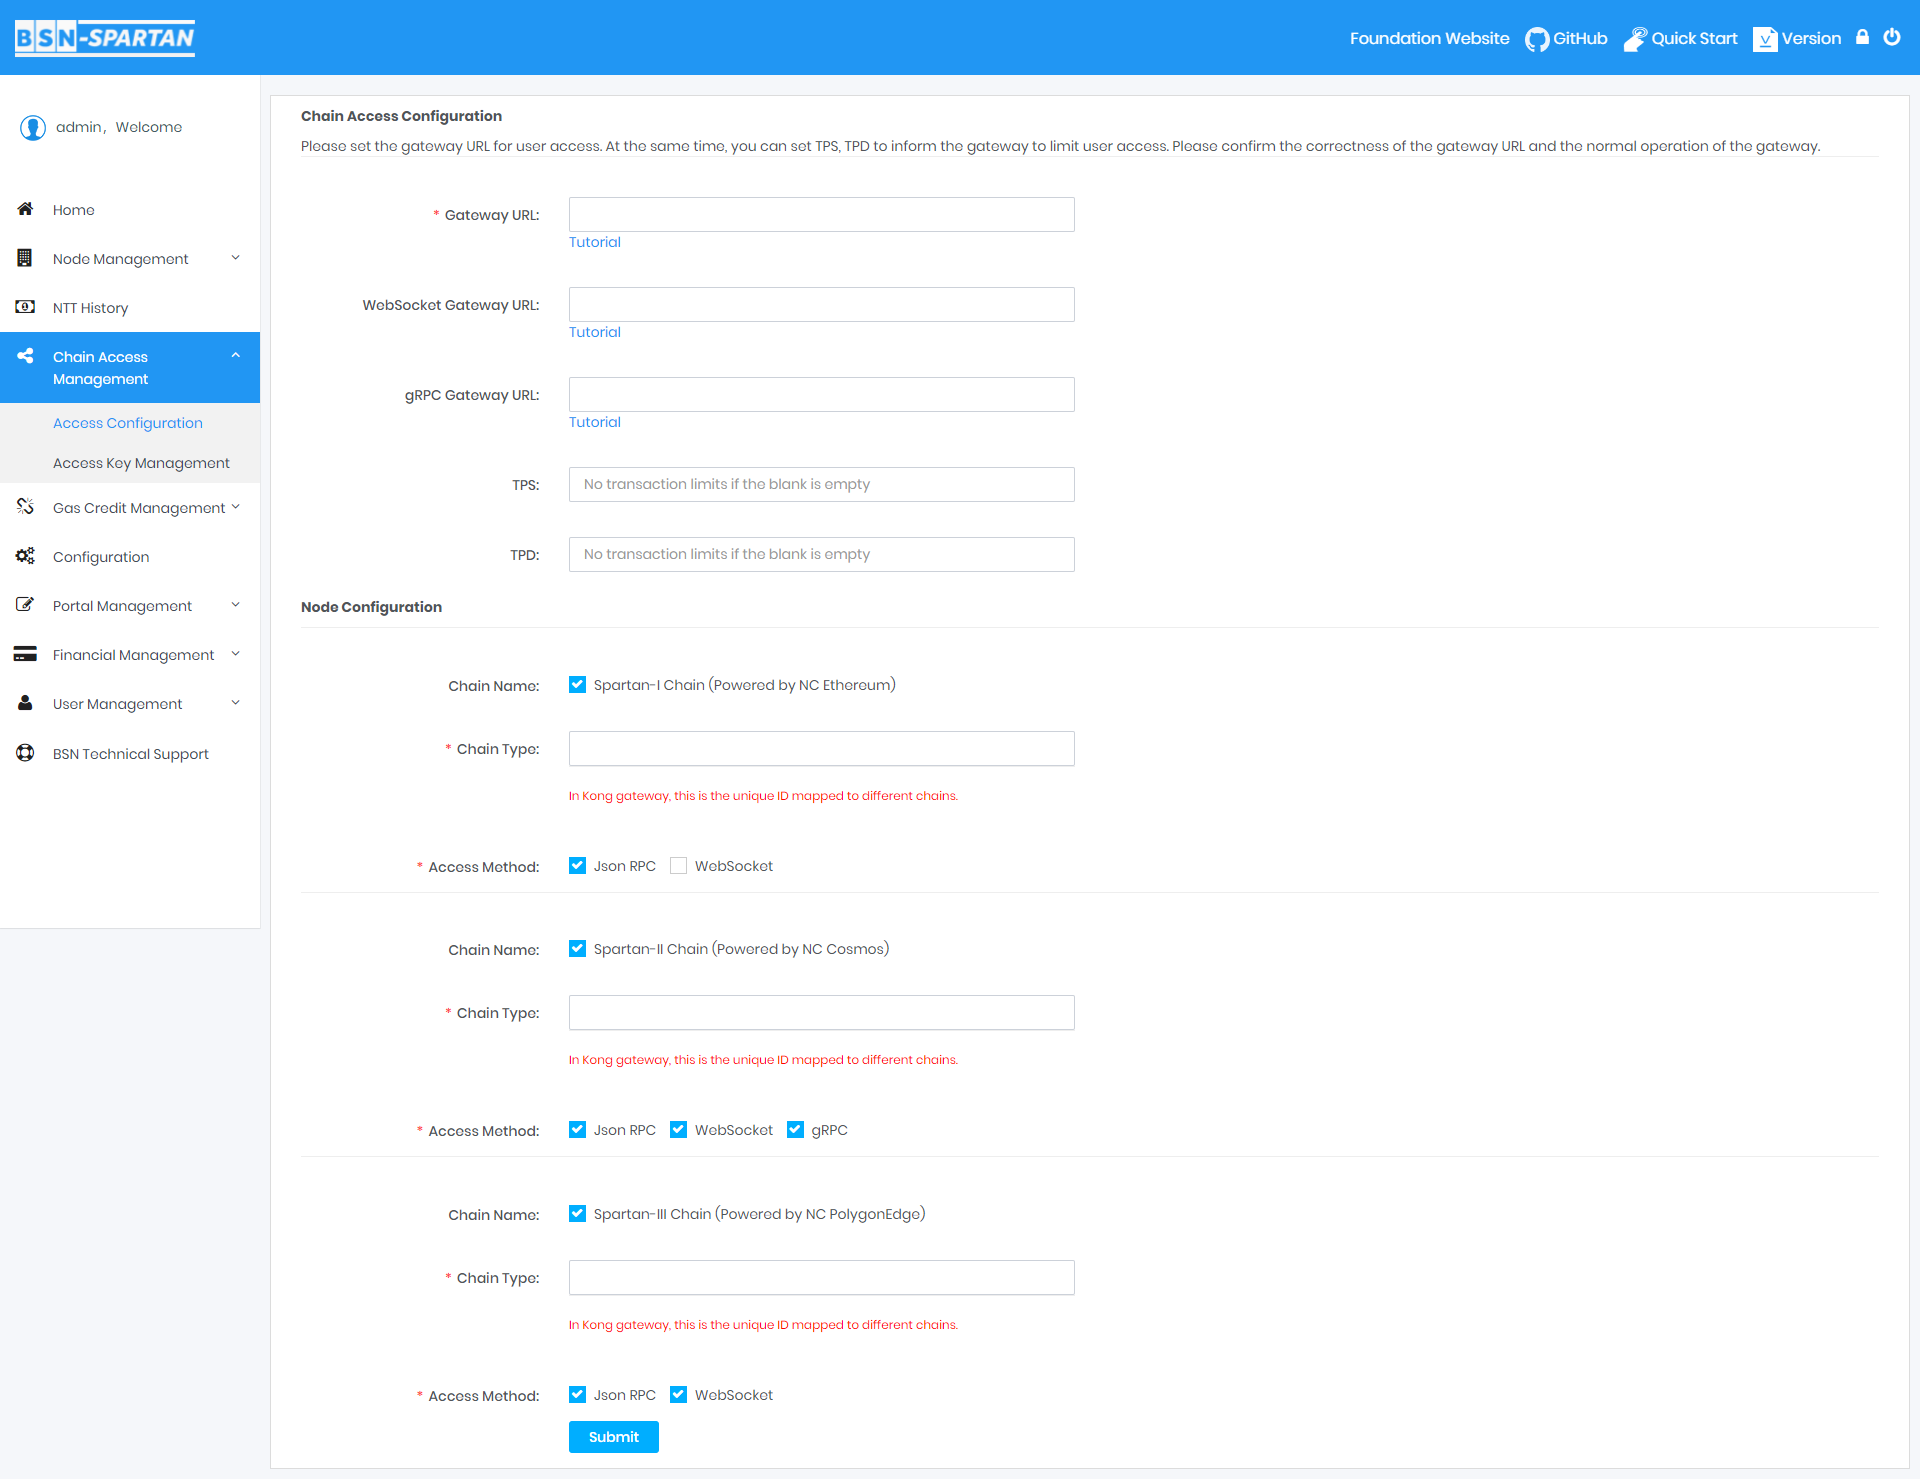
- Please set the gateway URL for user access. At the same time, you can set TPS, TPD to inform the gateway to limit user access. Please confirm the correctness of the gateway URL and the normal operation of the gateway.
Chain Access Configuration:
The gateway address and port number shall be configured differently according to the different access methods.
Gateway URL: Configure the access address and port number for JSON RPC;
WebSocket Gateway URL: Configure the access address and port number for WebSocket;
gRPC Gateway URL: Configure the access address and port number for gRPC;
TPS (Optional): Set the maximum transactions per second;
TPD (Optional): Set the maximum transactions per day.
Node Configuration:
Only the information of the chain corresponding to the successful node registration in the data center will be shown here.
Chain Type: In Kong gateway, this is the unique ID mapped to different chains. Spartan Network has three non-crypto public chains with the same gateway address, so it needs to distinguish them by the chain ID. Without setting the chain ID, users cannot successfully access the nodes;
Access Method: Spartan-I Chain (Powered by NC Ethereum) supports JSON RPC and WebSocket protocols; Spartan-II Chain (Powered by NC Cosmos) supports JSON RPC, WebSocket and gRPC protocols; Spartan-III Chain (Powered by NC PolygonEdge) supports JSON RPC and WebSocket protocols. After selecting the access method, the corresponding gateway URL is required to fill in.
[!danger|style:flat]
- If you do not configure chain access information here, end-users cannot select chains in the portal to access the Spartan Network.
You can view the access key information that the user created in the portal in "Chain Access Management" -> "Access Key Management":

You can enable/disable the access key and set the TPS and TPD. If there is no value set in TPS and TPD, it means the data center does not limit end-user's transaction requests.
Portal Management
You can use this module to customize the portal, including setting the portal logo, title, portal description, copyright information, technical support and payment methods.
Basic Information
This module contains the basic information of the portal, including the title, logo, introduction and copyright information.
Operation Steps
Click "Portal Management"-> "Basic Information" to enter the page:
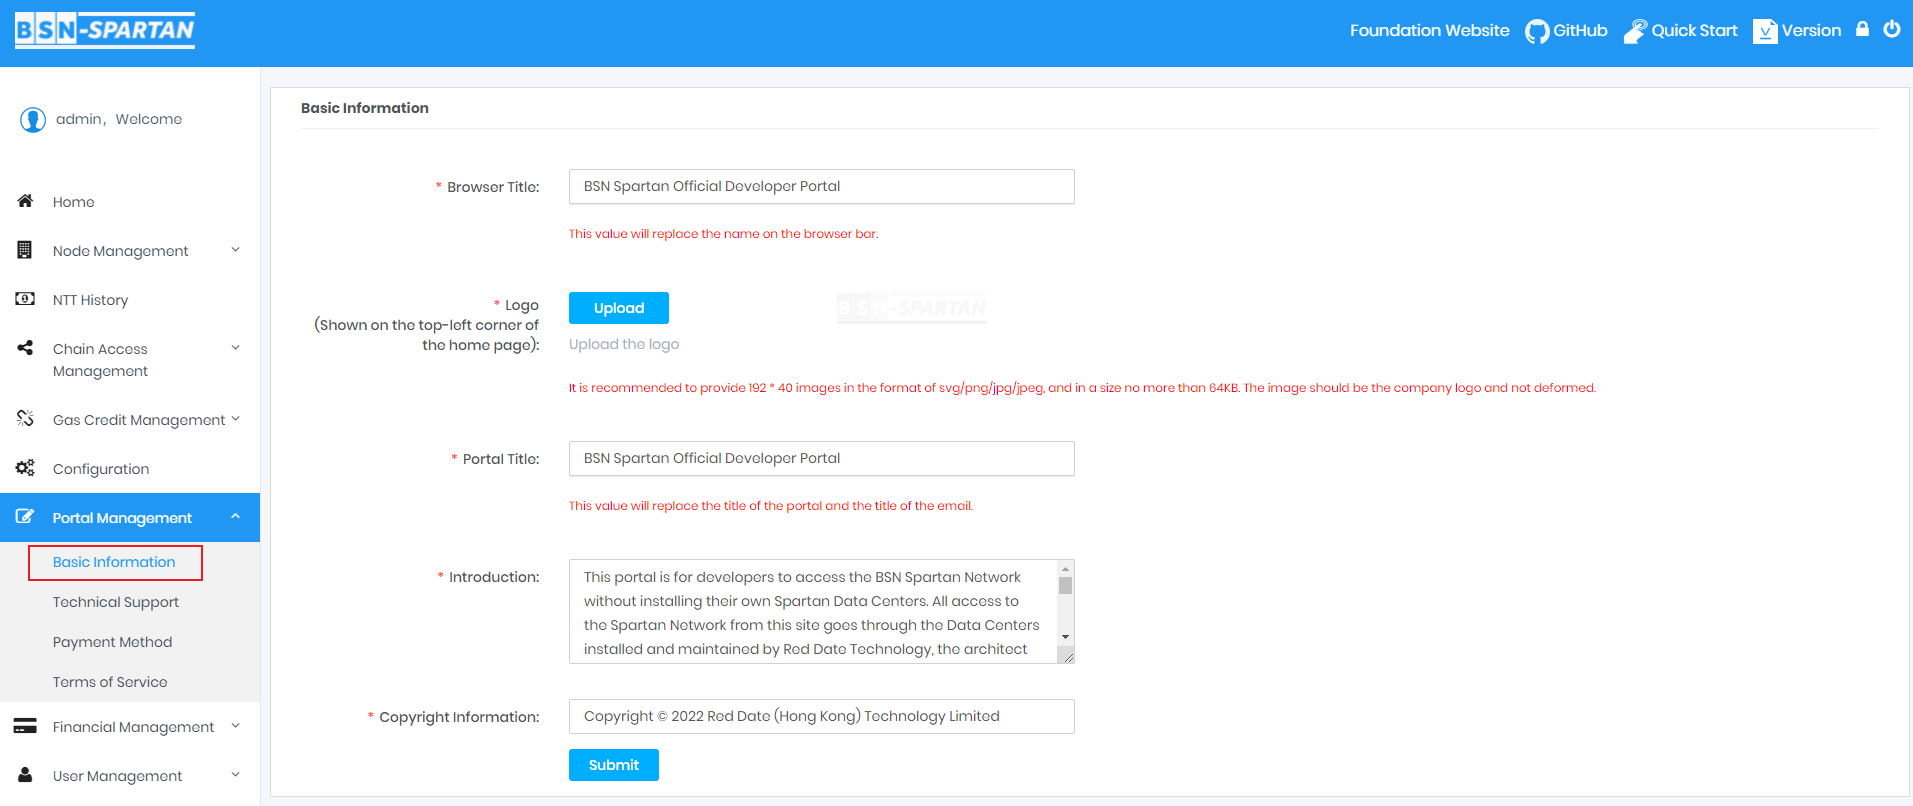
Browser Title: By default, it will be displayed as "BSN Spartan Network Data Center Portal";
Logo: Upload the logo of your portal. By default, the portal will display the logo of BSN Spartan Network;
Portal Title: The portal title. By default, the portal will display "BSN Spartan Network Data Center Portal";
Introduction: The introduction of the portal;
Copyright Information: Input the copyright information. By default, no copyright information will be displayed in the portal.
After configured, the portal is shown like below:

Technical Support
In this module, you can configure the technical support information and contact information show on the portal. By default, it displays the information provided by BSN Spartan Network.
Operation Steps
Click "Portal Management"-> "Technical Support" to enter the page:
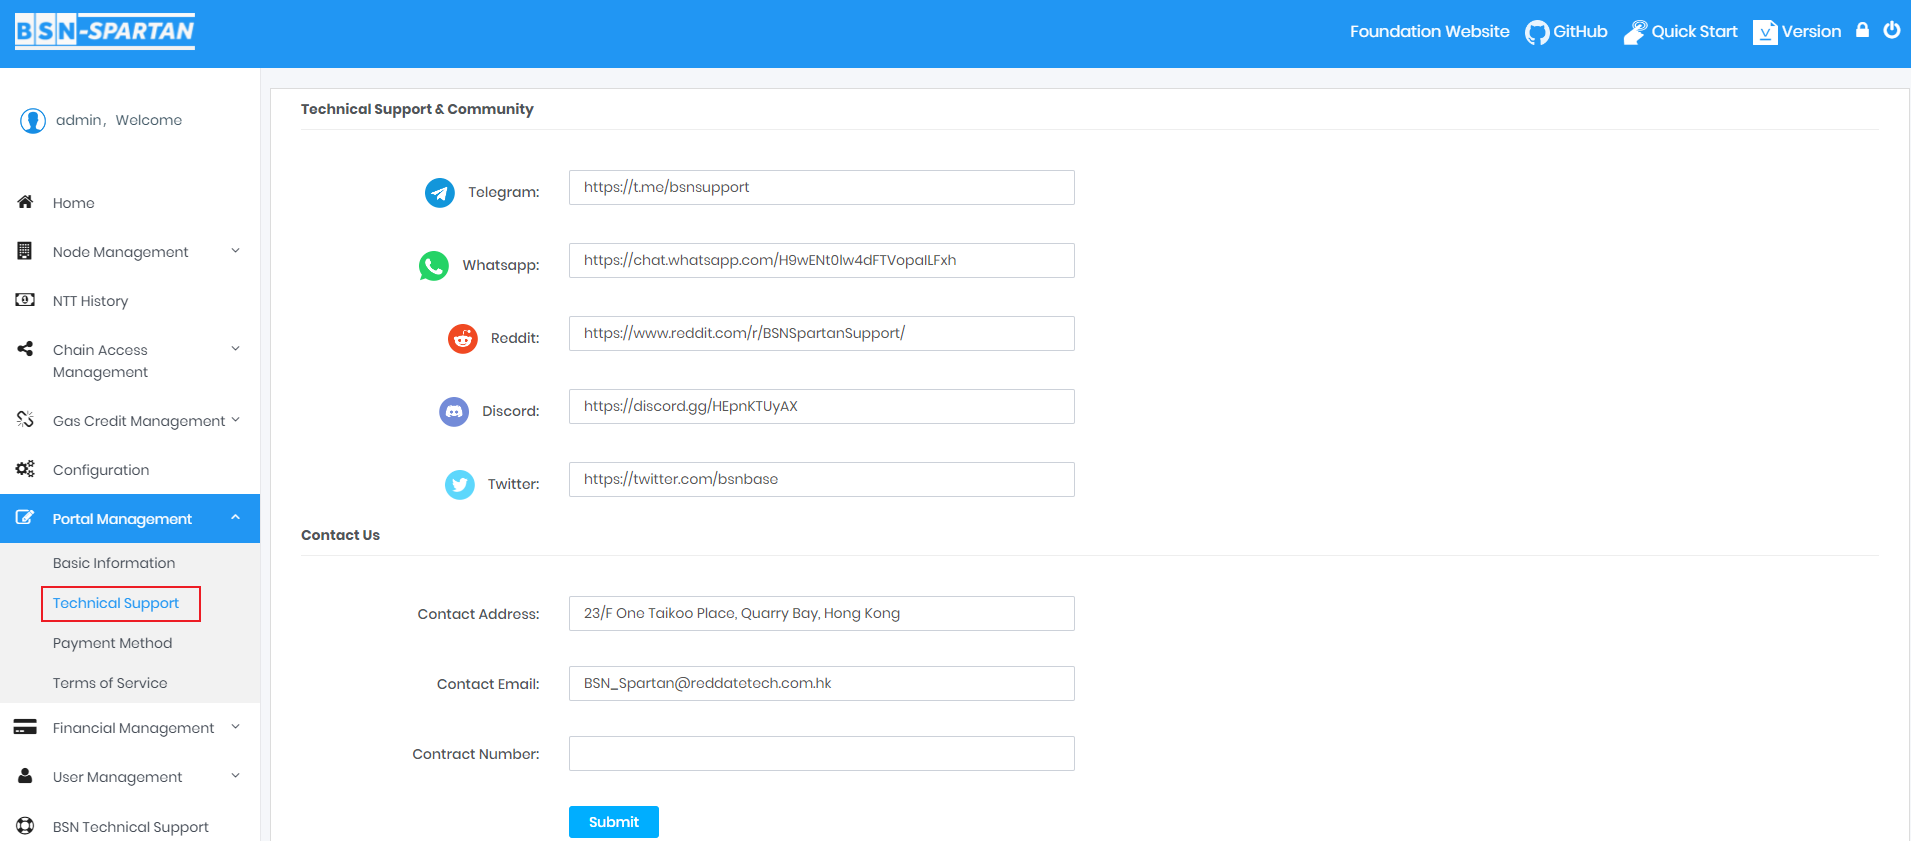
Technical Support & Community: Includes the information of Telegram, WhatsApp, Twitter, Discord and Reddit. If you leave them blank, this module will not be displayed in the portal;
Contact Us: By default, it displays the contact information of the BSN Spartan Network. If you leave them blank, this module will not be displayed in the portal.
Payment Method
This module enables your portal to support three payment methods, including pay by offline remittance, pay by Stripe and pay by Coinbase. Stripe accepts Visa, Mastercard, American Express and China UnionPay, while Coinbase supports USDC payment.
[!danger|style:flat]
- Please make sure you have chosen at least one method, otherwise end-users will not be able to top up Gas Credit in the portal.
Operation Steps
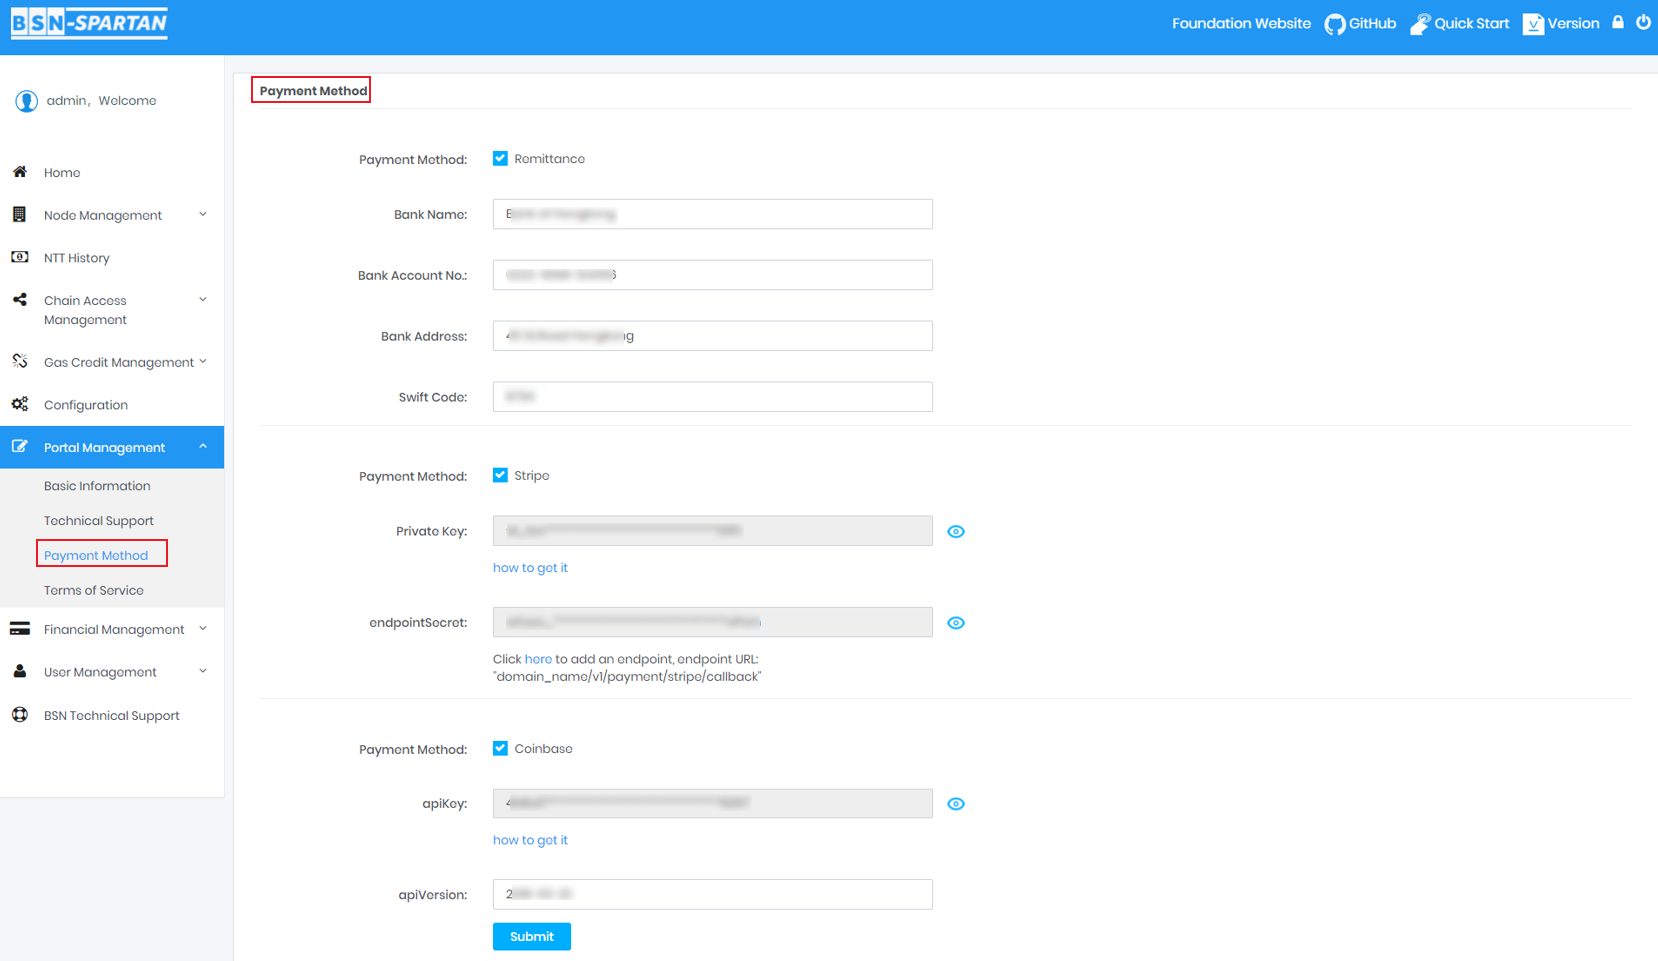
Click "Portal Management"-> "Payment Method" to enter the page:

Once you have selected the payment method, the information of this method is required to fill in.
Remittance: Input the information of Bank Name, Bank Account No. , Bank Address and Swift Code;
Stripe: Input the information of Private Key and endpointSecret;
Coinbase: Input the information of apiKey and apiVersion; you can sign up for a Self-managed Commerce account by selecting here.
If you have configured only one payment method in the first stage, you can use this page to enter the information of the other two payment methods later, and then click Submit.
[!danger|style:flat]
- If the payment method is modified when there are orders in Stripe or Coinbase that are being paid, only new order information will be retrieved from the new interface queried by the scheduled task. You need to query the previous order information through the interface provided by the third party, and then manually modify the order status in this system by clicking Remittance button.
Terms of Service
The Terms of Service Agreement is needed when users are using the Gas Credit Top-up page in the portal. It is not required if the Gas Credit Top-up function is not enabled.
Operation Steps
Click "Portal Management"-> "Terms of Service" to enter the page:
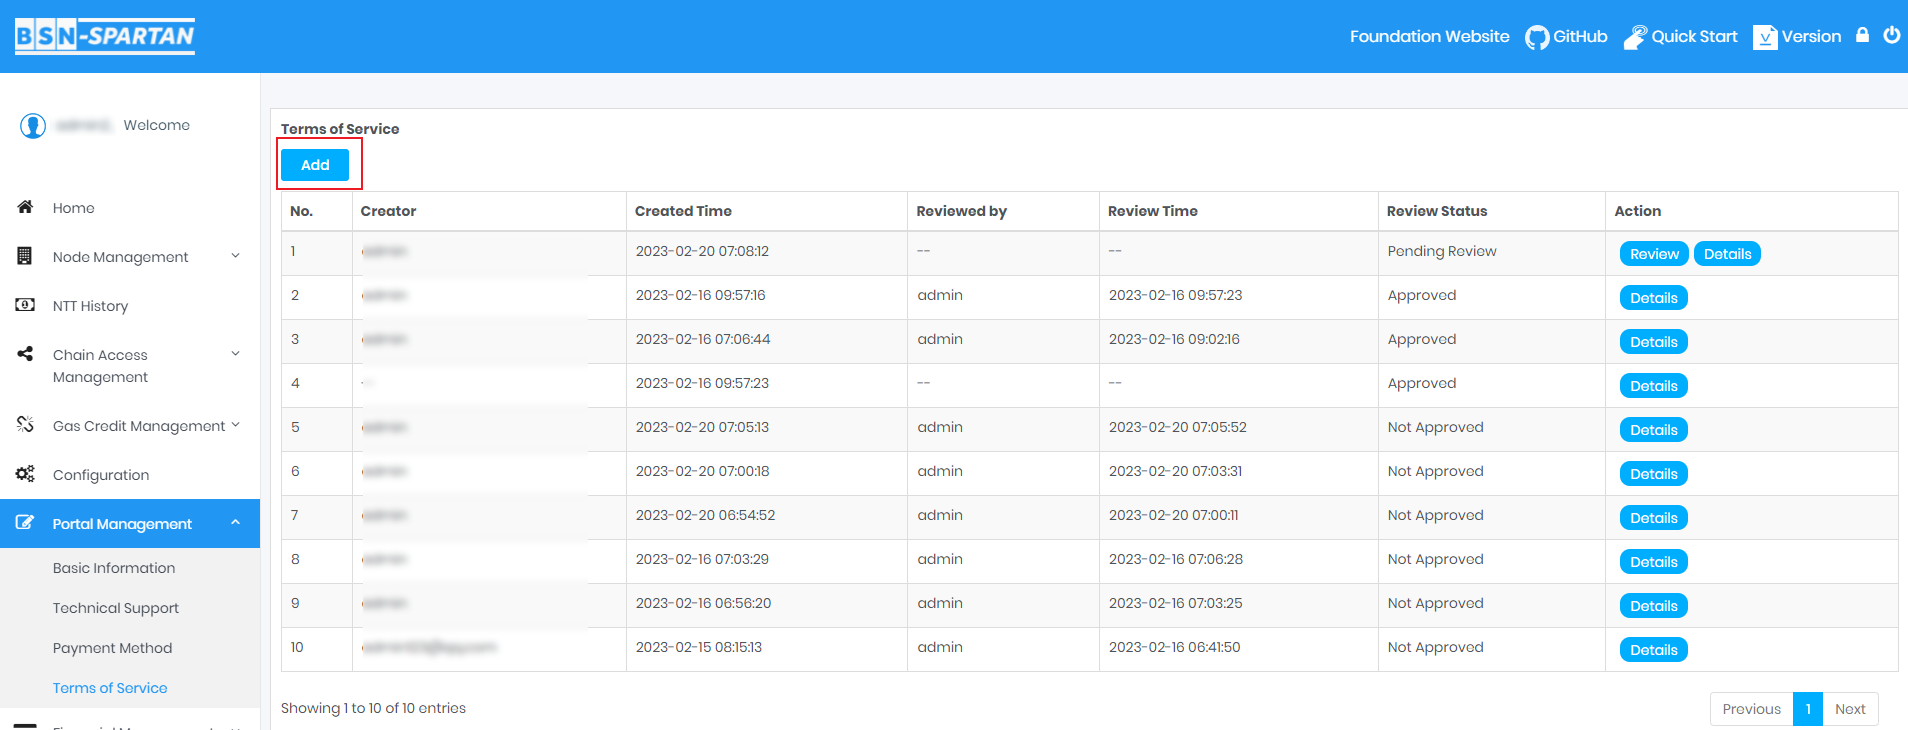
Click the Add button to add Terms of Service:
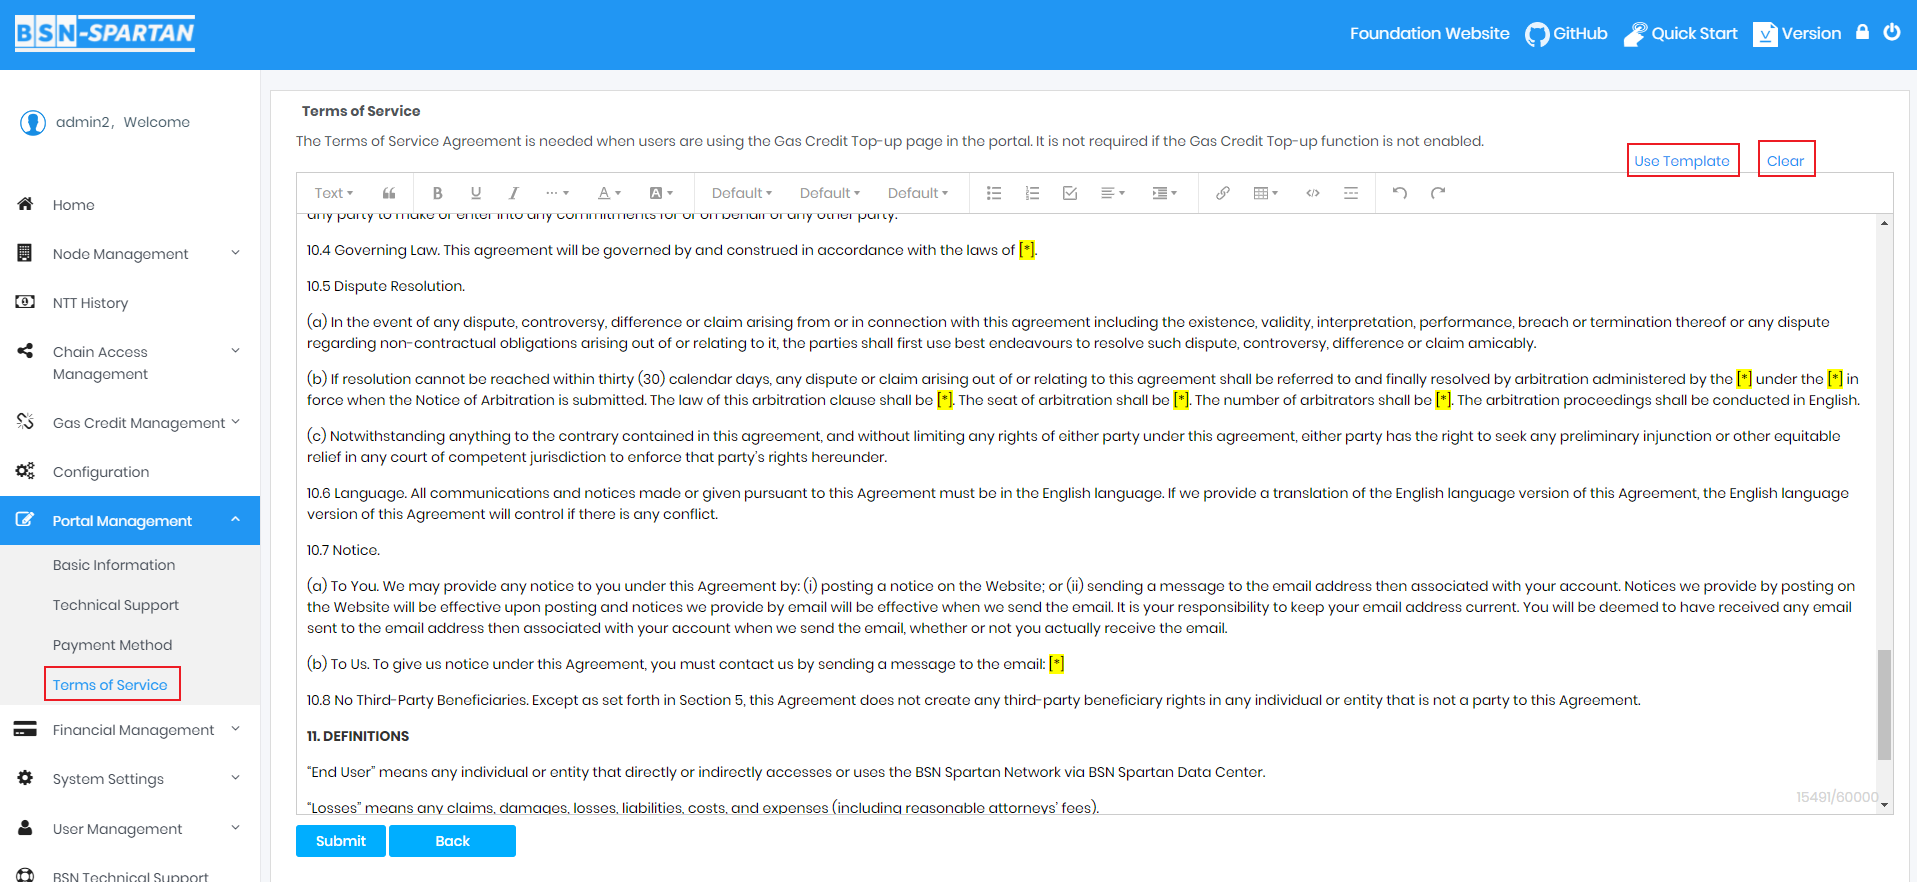
You can use this service agreement as a template, and we have marked the parts that need to be modified in yellow. Or you can of course use your own service agreement. After editing the service agreement, click Submit and it will take effect in the portal after the review is approved.
System Settings
System Settings can help you set up Alert Settings and Email Settings, enabling you to better manage your system. By setting up the alert value, you can receive timely reminders before your NTT wallet runs out of NTT or Gas Credit. In Email Settings, you can easily send system-related emails to your team members or your users in different ways.
Alert Settings
To keep their businesses running properly, operators of the system can set up the alert value of NTT balance and Gas Credit balance of their NTT wallet. Once the NTT balance or Gas Credit balance is less than the entered value, the system will automatically send an email to notify the relevant staff for top-up.
Operation Steps
Click "System Settings"-> "Alert Settings" to enter the page:
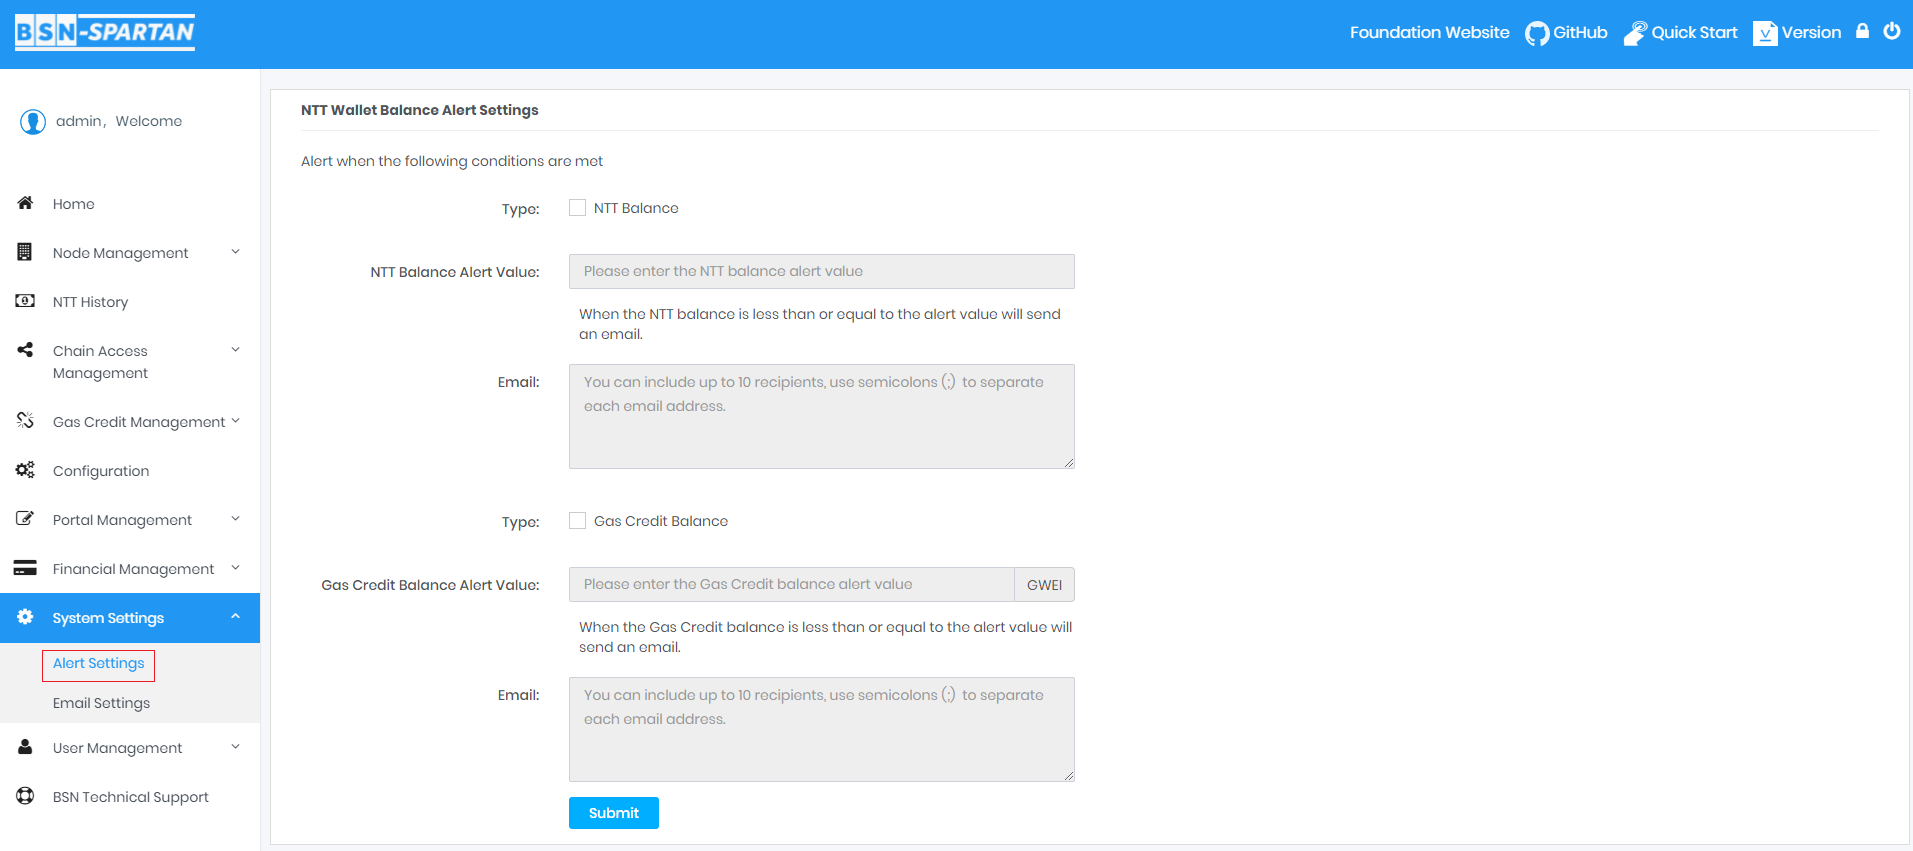
Operators can set the alert for one of them or both, enter an alert value and the email addresses they want to send. Each type of alerts can be sent to up to 10 different email addresses. After entering the information, click submit to complete the settings.
Email Settings
When configuring email services in the system, you can choose to use either Spring Mail or Amazon Web Services Simple Email Service (AWS SES). Spring Mail is an open-source email sending component that can be easily integrated into your application. It supports multiple email protocols and servers, and it has high flexibility and low development costs. AWS SES is a cloud-based email service with high reliability and security, global coverage, and flexible scalability. It is designed to help you send transactional emails and marketing messages. Regardless of which email service you choose, you can easily integrate it into the system by configuring the relevant parameters and then start sending emails.
[!danger|style:flat]
- To enable the email notification service in the system, please configure the email settings first.
Operation Steps
Click "System Settings"-> "Email Settings" to enter the page:
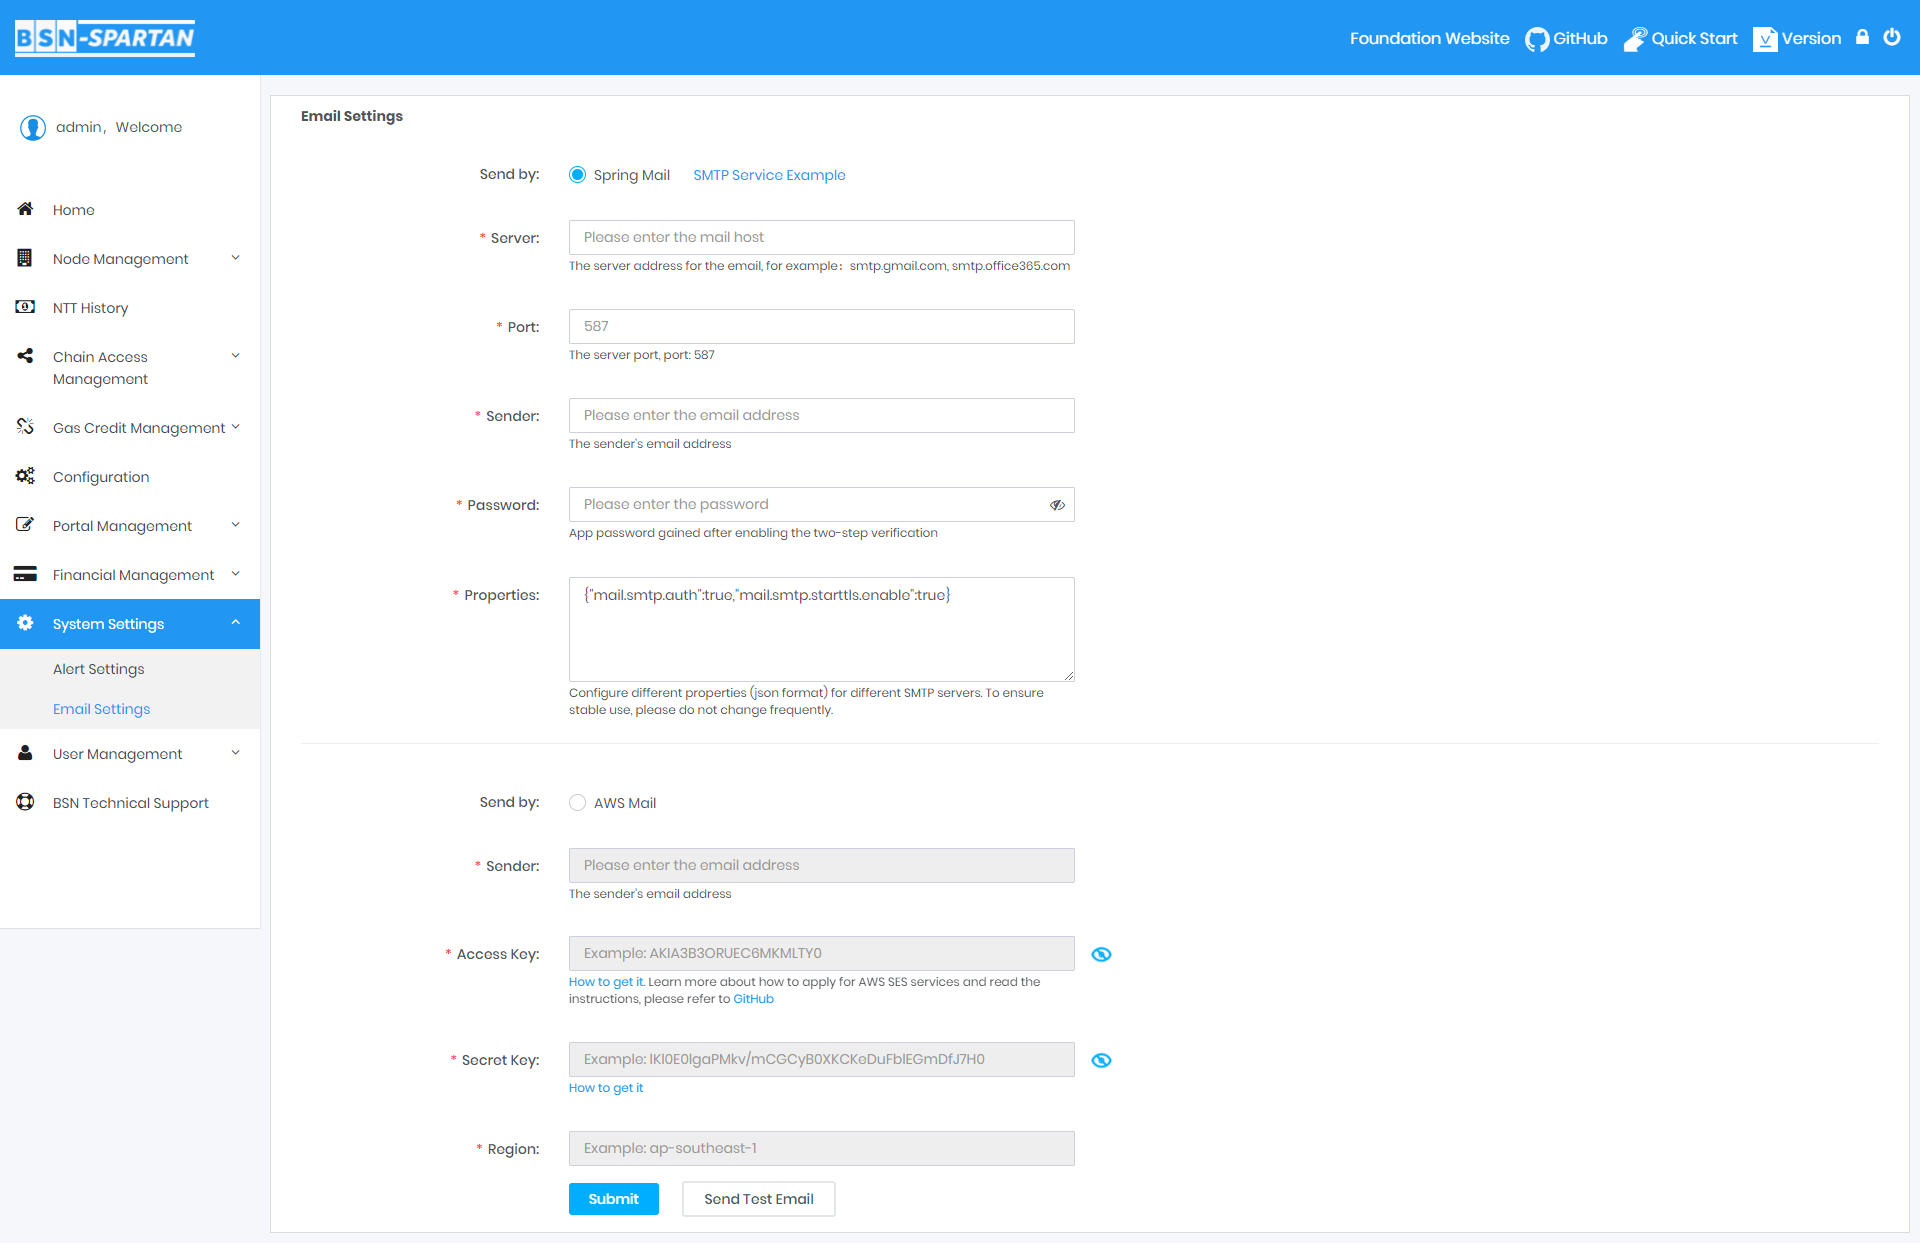
Spring Mail configuration information is as follows
Mail Host: the hostname or IP address of the email server, which specifies which email server Spring Mail will use to send emails;
Mail Port: the port number of the email server, which specifies which port Spring Mail will use to communicate with the email server;
Sender: the sender of the email, which is used to specify the address that appears in the "From" field when sending emails;
Password: the password associated with the sender, which is used for authentication and authorization to access the email server and send emails. Based on different email servers, some passwords are login passwords while some others are two-step verification passwords;
Properties: a collection of other parameters of the email server, which can be used to set security options such as SSL/TLS and configure special features supported by the email server.
By configuring these parameters, Spring Mail can communicate with the email server and send emails using the specified sender and server.
AWS Mail configuration information is as follows
Sender: The sender of the email;
Access Key: a unique ID associated with your AWS account, which is used for authentication and access permissions of AWS services;
Secret Key: a password associated with the Access Key, which is used to prove ownership and access permissions to the account;
Region: the geographic location of AWS SES, which can affect its performance, availability, and pricing. You can choose the Region closest to your location to better use the AWS SES.
[!Tip|style:flat]
Learn more about how to apply for AWS SES and read the instructions, please refer to GitHub.
Learn more about the pricing for AWS SES, please refer to the official documentation.
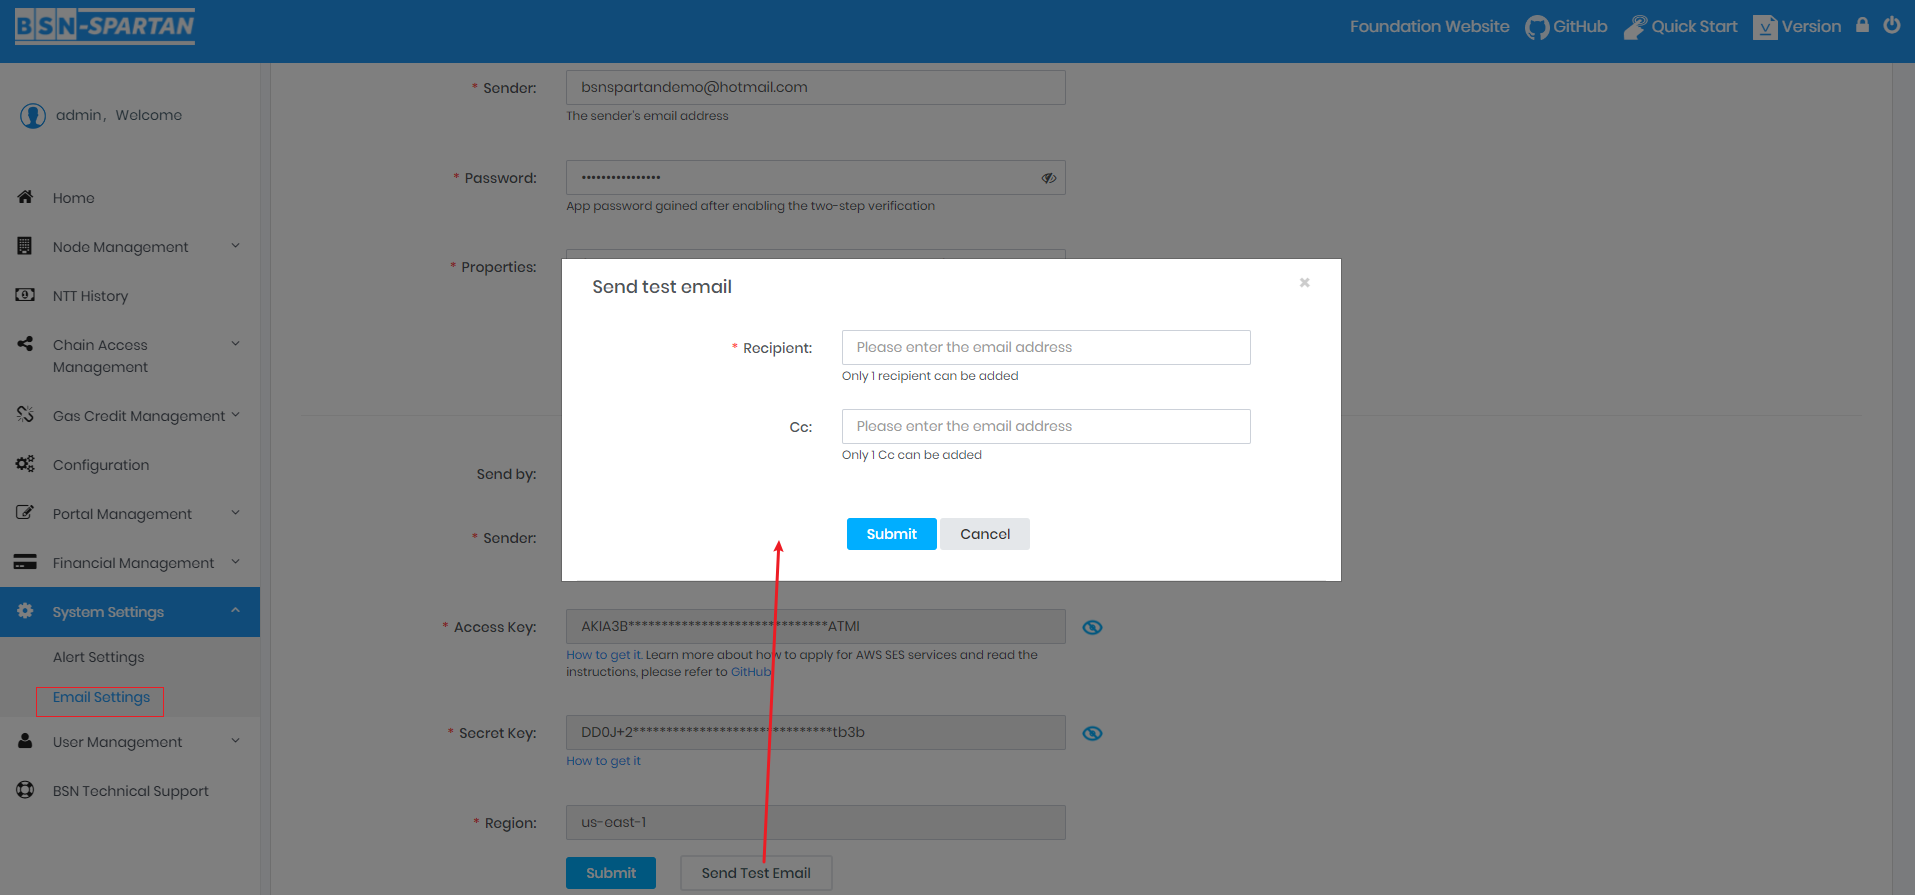
After completing the email configuration, you can send a test email to verify whether the functions can work properly or not.
